Hi there girls and welcome to this month's multiphoto class.
I have always liked multiphoto layouts but with my "white space" style I can't see myself using big photos. They'd fill up too much space and that is just not me. Still some memories need more photos. So here is my technique: make them smaller. Reduce your photos in size and you'll be able to fit plenty more on a layout. You can use photoshop, the gimp, picasa and there are many other programs that can help you.
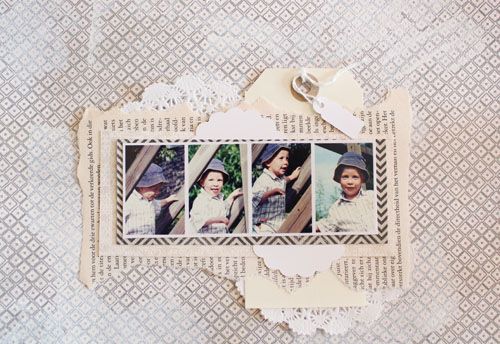
For this class I have created a layout using a series of 4 small photos and of course the July My Scrapbook Nook kit. There are quite a few photos showing how the layout come about. I hope this class has taught you something, I for one loved creating this layout and photo tutorial.
Supplies: July kit, tag /brads / doilies / stamps / and buttons from my stash, gesso, page from an old book.

Step 1:
Take your background paper and add some gesso using a credit card (old one.)

STep 2:
Tear a page from an old book and place it on the layout.

Step 3:
Cut out two pieces of different patterned papers and layer them beneath your photos.

Step 4: Add a tag, doilies and diecuts.
Step 5:
Add two pieces of PP to either side of the cluster on a diagonal. Cut some of the metal MME flowers into pieces an place them with the buttons. I created three embellishment clusters each with one button, a "bling" pearl and a petal from the metal flower.

Step 6: Stamp to create a "flow"
I have always liked multiphoto layouts but with my "white space" style I can't see myself using big photos. They'd fill up too much space and that is just not me. Still some memories need more photos. So here is my technique: make them smaller. Reduce your photos in size and you'll be able to fit plenty more on a layout. You can use photoshop, the gimp, picasa and there are many other programs that can help you.
For this class I have created a layout using a series of 4 small photos and of course the July My Scrapbook Nook kit. There are quite a few photos showing how the layout come about. I hope this class has taught you something, I for one loved creating this layout and photo tutorial.
Supplies: July kit, tag /brads / doilies / stamps / and buttons from my stash, gesso, page from an old book.
Step 1:
Take your background paper and add some gesso using a credit card (old one.)
STep 2:
Tear a page from an old book and place it on the layout.
Step 3:
Cut out two pieces of different patterned papers and layer them beneath your photos.
Step 4: Add a tag, doilies and diecuts.
Step 5:
Add two pieces of PP to either side of the cluster on a diagonal. Cut some of the metal MME flowers into pieces an place them with the buttons. I created three embellishment clusters each with one button, a "bling" pearl and a petal from the metal flower.
Step 6: Stamp to create a "flow"

Step 7: Add your title, journalling and more stamping if desired.


1 comments:
I love this layout! Visit your blog "daily" for inspiration and tons of ideas....love your techniques and use of various patterns .. my gift to myself soon, a Sillouette Cameo! YEAH and THANK YOU!
Post a Comment